Showing posts with label Celebrate. Show all posts

Wednesday, November 24, 2010

Studio 5: Paper Crafted "Give Thanks" Turkey Centerpiece

Create this unique paper crafted Thanksgiving table ensemble with simple supplies, step-by-step instructions and in just a few hours.

This “Give Thanks” centerpiece is three dimensional so it can be seen from all sides, yet not so bulky that you can’t fit the gravy on the table!
Adorable mini turkeys pull the look together and do double duty as place cards and/or napkin holders.
You can download the free templates here.  You can either download the jpegs or go to the PDF Files page and download printable pages.

What you’ll need to complete this project:
Scrapbook Paper! I used the beautiful new Moonrise paper from SEI, but find any coordinating paper that you’d like OR go through your scraps and see what you come up with.
You’ll need 3 sheets of two and 2 sheets of two different colored papers for the centerpiece. Double sided is nice.

Foamcore (or Foam Board), is available at most craft and office supply stores. 1/4” for the place cards and ½” for the centerpiece, but you can always stack two pieces of ¼” if you can’t find ½”.


Circle Punches (or you can cut them by hand or use your favorite die-cutter).
Ink pads to distress with (I used black for the dark brown paper and Tim Holtz Distress Frayed Burlap ink for the others).

Chipboard, which you can buy at craft stores, or you can sometimes get it for free if you ask. You can also recycle your cereal (and other food packaging) boxes, as this is the same material. Just make sure to cover it all.
Exacto or utility knife to cut foam board and Scissors to cut chipboard and paper.
Adhesive; I used Scotch ATG tape, but anything that is strong will work.

Step 1: Punch out circles for double-sided Centerpiece Turkey. You’ll need
• 26 - 3”dark brown circles
• 26 – 2 ½” orange/yellow scalloped circles
• 30 – 3” polka dot circles
• 30 – 2 ½” green patterned scalloped circles


Step 2: Distress each side. I used black ink for the Dk brown and Frayed Burlap (Distress) ink for the rest. To speed up this process, lay circle flat on table and rub ink pad directly over edges. This only works with the distress ink, I used a sponge for the black ink on the brown paper.

Step 3: Fold circles into cones. I folded them all first and then laid a strip of adhesive along the bottom of the cone and folded them closed. Creating an assembly line will save you quite a bit of time.
Step 4: Create Feathers. Lay a strip of adhesive on the back of the smaller folded circles and tuck them into the larger circle cones.
Step 5: Create Tail Feather bases. Print out Tail Feather Templates (large & medium). Assemble and then trace out on chipboard and matching paper. Adhere paper to chipboard. Lay a strip of adhesive on back of double feather cones and adhere all along the circumference of the base. You may want to lay them all out first to make sure your spacing is correct.


For larger Tail Feather base, cover the front and back of chipboard with paper and feathers. Create two separate chipboard pieces for the medium tail feather bases.
Step 6: Create Turkey bodies. Print out Large Turkey body, cut out template and trace on Dark brown cardstock. Cut out (optional: sponge the edges with black ink). Print and cut out Turkey Wattle and beak. Trace on patterned paper and adhere to front of turkey. Attach two brads above the beak for eyes.
Print out “Give Thanks” heart on Orange patterned paper and cut out. Distress edges and adhere to front of turkey with ½” foam squares.


Lay turkey body in center of Medium Tail feather base and adhere the 3 extra polka-dot cone feathers around his head to fill in the spaces. Refer to image.


Step 7: Assemble Turkey:
Print out Foam board divider template and trace onto foam board. Cut out with knife.


Adhere tail feather bases and dividers together. This will stabalize the entire project so it can stand on it’s own. You could use ½” plywood as well.
Finish by adhering turkey bodies to the front and back of project.
For Place Card Turkeys, repeat the process except punch out the following
• 7 – 2” orange/yellow circles
• 7 – 1 3/8” dark brown circles


There is only one layer of feathers for the place card.
Use template for Placecard turkey body, Tail Feathers, Wattle and beak.
Use smaller brads for eyes.
Cut a 2” x 3 ½” piece of chipboard mounted on the back of place card so it will stand on it’s own. Bend strip at 2” mark.


Alternatively you could attach the entire place card to a knapkin holder.
To customize your names for the place cards, purchase the font (SNF GOODY) for $3 at scrapnfonts.

Happy Thanksgiving!

Friday, September 3, 2010

Let them eat cake!

It's been almost 2 weeks since my daughter's big wedding day. I suppose it's time I start sharing. You've all been so patient with me but I suppose it's time I start sharing all the wedding prep joy.

I hope to have wedding pics next week and can share those with you too, but in the meantime, I want to share the thing that was truly out of my comfort zone, but had the most fun doing.

I had originally decided to do a 5-tier wedding cake, starting with a 16" square base. But the more I thought about it and talked to friends who had receptions recently, I got the feeling that was a bit of a waste.
Why spend $ or time making this grand cake which no one eats until the very end of the reception by which time they are full of other things.

So I choose to go with a hybrid cake & cupcakes set-up. I happened to have a gorgeous 3 tier silver piece that I knew would be perfect. I put the smaller 3-tier cake on top and use the lower tiers for cupcakes.

The cupcakes got eaten (more on that later), the pretty cake remained pretty for most of the reception, was enough to cut into for the traditional mushing cake into groom shot and the little top cake went into the freezer for the traditional 1st year anniversary.

I really loved how it turned out, but try as I might I can't help seeing all the little imperfections everytime I see a picture. This doesn't discourage me, I take up the gauntlet! I am challenged! More cake please! I'm dying to make another one!
It all started out with making the cakes and finding a recipe I loved. I'm a little surprised that the one I picked was a hybrid cake-mix and scratch ingredients, but honestly, it tasted the best and was super moist. I LOVE this recipe. I got it originally from Carrie Lowe and made a few little changes here and there.

Double Lemon Cake

1 package lemon cake mix
1 C sour cream
1 Lemon (rind and juice)
3/4 C water, less the juice from the lemon
3/4 C oil
4 eggs
1 tsp Vanilla
1 small package lemon instant pudding


Mix dry ingredients. Add wet ingredients. I juiced the lemon, poured it into a measuring cup and then added enough water to take it to the 3/4 cup level. Mix with electric mixer on medium speed for about two minutes. Use a strong mixer, this batter is thick.
For cupcakes, bake them at 350 degrees for 20 minutes (I was able to get 24 very full cupcakes from the recipe). For regular cake, pour into a greased 9×11 pan or two round pans. Bake at 350 degrees for 25-30 minutes. Don’t over bake or the cake will be too dry! The toothpick test works to check to see if they’re done.

I repeated the same basic recipe for the chocolate cake (yes, I did several), but used chocolate cake mix, chocolate pudding and orange juice for the water with orange extract instead of vanilla. Orange rind would have really popped the orange taste, but I didn't have any fresh and didn't have time to get them. But next time I would try that.

What I love about this recipe is how versatile it is. Vanilla cake? Coconut? Just switch out the cake mix, pudding and liquids.
I used a 10", 8" and 6" cake form, using several layers to get the height. I froze them and took them out when I was ready to decorate.

Next step was the decorations. This was absolutely the most challenging part of making this cake. I refused to be daunted. I've watched Linda McClures videos, I've seen her cakes, I knew it must be possible!! But let me tell you, it was hard. BIG learning curve.
I borrowed my friend, Alisa Bangerter's Cricut Cake, but feel very comfortable using my regular Cricut next time.

There are two things to remember about cutting gum paste on your cricut. Wilton dry mix gum paste will NOT work. It's a very soft product compared to a pre-made gum paste and just wouldn't firm up enough to get a perfect cut. The Wilton Mix was perfect for other things though, but I'll talk about that when I post about cupcakes.

I was running out of time, so I ordered Linda McClure's gumpaste (they really did me a big favor, so I love them!) but I also picked some up at Orson Gygis. I only ended up using Linda's gumpaste because it worked perfectly, but will try the other one another time.
I would also try making it, you know, when I have lots of extra time! LOL

The other thing for successful cricut gumpaste cuts is letting the gum paste cure. I suggest watching Linda McClure's videos she has on Youtube, they were really helpful.
Her gumpaste is so hard, that you really had to put it through a pasta machine to get the thinness I wanted. So, one night my hubby helped me roll all the gumpaste out. I placed it on clear mylar sheets and stored it all in a large ziplock bag.

The next day, a good 12 hours at least, it was ready to cut. You have to find this perfect stage of the gumpaste where it's cured enough to cut smoothly, but not dried out. I finally got it and was in cricut cake making heaven!

I sprayed my pieces with edible pearl mist and then sprinkled edible glitter on it. At the time I was planning on a tone-on-tone cake, so I wanted them to stand out a bit.
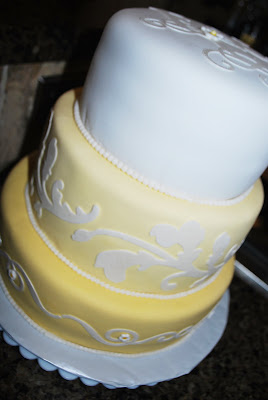
A few days later, ready to put the cake together (the day before the wedding), I pulled the frozen cakes out and put fondant on. I have a recipe for making fondant, but again, due to time, just purchased it. At the last moment I decided to color the fondant and due a gradual color movement from Yellow to white. I liked how that looked and it helped the gumpaste pieces stand out.

Once they were done (and yes, I know I need more practice here), I started 'glueing' my gumpaste pieces on with crisco. I also invested in a gumpaste pearl string mold and had made a bunch of those the day before. It came together pretty quickly and I was so, so pleased and more importantly my daughter was.
It was a lot of work, but I saved money and did something I've always wanted to try. I have new-found respect for ALL cake decorators. It is quite a skill, one which I hope to hone over the years.

Tuesday, December 8, 2009

Studio 5: Christmas Cheer with Bite sized fun!

Here are some really tasty ideas for your upcoming Christmas get-together. You're all having one, right? Come on! It's easy; your home is already decorated and never looked so good, the Christmas carols are already queued up on your player, all you need are a few extra hours earlier in the day to cook and you're ready to spread some Christmas Cheer! Please visit the Studio 5 website for the recipes!

There is nothing like paper crafting to brighten up the holidays, and it doesn't have to be time consuming or big...in fact sweet small projects are the focus of today's studio 5 segment. Don't forget to visit the Studio 5 website to see pictures of all the projects and the article I wrote.


Don't forget my link to my friend Heather's very yummy Spicy Pear Jam that I had on air today.

Thanks to both Heather & Karen (you are SUCH an inspiration to me!) for their bitty nugget project ideas. They are SO darling and a bit hit at the studio.

Lastly, here are instructions to make the last 3 smallest projects, because I know you're all going to want to make them!

To create the nugget purse, cut a 1 ½” x 5” piece of red cardstock. Score at 1 ½”, 1” and again at 1 ½”. Corner round both corners of the last section. Distress edges of piece with ink if desired. Cut a 3/8” x 5” strip of patterned paper and adhere to middle of red piece. Punch two small holes in crease of first scored section on both sides. Thread 1/8” ribbon through, knot and trim for handle.
Adhere entire purse closed and embellish with a little flower, gem, brad, button etc…and a little gift tag printed on the computer.

To create the nugget wrap, punch a Scalloped Oval shape from cardstock. I used a
Clever Lever Giga Craft punch by Marvy uchida, but you can use any similar shaped punch or even die-cuts. Score on either side of shape, approx. 1” for short ends. Punch a 1/8” hole in each end and thread a 5” piece of ¼” ribbon through holes. Adhere nugget to center of oval with a bit of adhesive and then wrap shape around the nugget and tie ribbon in a bow.

Students...does this look familiar? a smaller version of the large Hershey chocolate slide card we made in August. Thanks to one my students (don't hate me, I can't remember which one!!) for showing me the mini version they created, you totally inspired me to create this tiny Chocolate Slide: cut a 4” x 4 ¾” piece of cardstock. Score ¼” from one long end and 2 ¼” from the other end. Fold and then lay flat again. Stamp a sentiment on the bottom of one side, fold again and adhere along the bottom and side to create pocket. Punch 1 5/8” hole in top of pocket. Thread ribbon through both holes. Push chocolate into the pocket with the ribbon. Tie the ribbon into a bow in the front of pocket. Embellish front of slider with a tag, glitter glue, gems or punch out shapes. To open, just pull bow and it will reveal the chocolate without them having to untie the ribbon.

You can custom create your own little wraps and sliders depending on the size of chocolate you use, just alter the dimensions. Enjoy!

Winners: Sadie & Erin! You two were the closest with your 'small' guesses and won! I'll email you with your prize details! For everyone else, thank you so much for all your guesses, they were so good I might just have to steal them for next year!

Friday, November 13, 2009

Two new class kits on Etsy & Give-away


I finally got my last class on etsy for all of you who could not attend classes this month. And, it's not too late to order my Give Thanks Album kit.


This is the table setting I was planning on for Thanksgiving dinner, until my darling Mother-in-law invited us to join them in Idaho. What a treat! All I have to make is pies! So, instead I'm going to take pictures on T-day, add them to the albums and give them as Christmas gifts.

I'm re-stocked on my Nifty Thrifty Christmas Card Class kits as well. We had so much fun making them the last few weeks. There is something about seeing so many cards made that just makes me smile. This picture is just a sample (only 21 of the 75 I made) of cards I made last month...in a hotel room, late at night. Now, the challenge it to make even more for my personal Christmas card list.
Had to share this picture of one of my Clinton classes. Love, love these ladies and all of my students. I feel so blessed to have them in my life. They are all so thoughtful, kind and creative and I look forward to seeing them every month.

I didn't do prizes for last month's class (mainly because I was using the albums I created, after all, it had our picture on it!), however, there are the 2 cards on each poster, so I have seven sets of cards to give away. Please leave a comment and I'll pick a winner at the end of this weekend.

Monday, September 7, 2009

World Card Making Day...4 weeks and counting

In 2006 Paper Crafts Magazine created a special day just for card making; it was called National Card Making Day...but based on the response we got and the world-wide popularity of card making, we changed it to World Card Making day.

Today, in our fourth year, World Card Making Day is celebrated by hobbyists, retailers and manufacturers "to unite and celebrate the connection and creativity that is the heart of card making".

World Card Making Day is always celebrated on the first Saturday in October, for this year, that means Saturday, October 3rd!

For several ideas on how YOU can participate, please read here.

I have some fun things planned for that day here on my blog, so please save-the-date and check my blog that day for free downloads, card ideas and contests.

Q's Creative Card Classes's Fan Box

Contact Me

Favorite Quote

"The art of being
HAPPY lies in the
POWER of extracting
happiness from
COMMON things."
~Henry Ward Beecher

Subjects


Q's Creative Card Making Kits | Creative Commons Attribution- Noncommercial License | Dandy Dandilion Designed by Simply Fabulous Blogger Templates

01 09 10