Showing posts with label Wedding. Show all posts

Friday, December 22, 2017

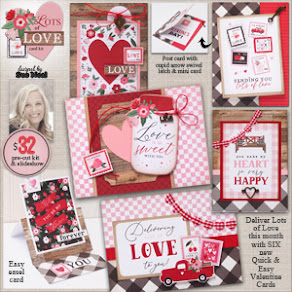
Q's Creative Cards: SAVE the DATE Celebration Cards!

Happy New Year!  Wow, 2018!  I really love new beginnings; full of plans and hope & excitement!  

These cards commemorate those special dates in life; Birthdays, Weddings, Babies and Graduation!  

This kit also includes a cute little journal to keep in your purse.  I always have one in my purse so I can record special moments, inspirations, thoughts, lists etc...on the go!  

This kit is ready to assemble and comes with written instructions & a step-by-step photo slideshow.  It also has bonus printables and cut files.  Kits start shipping Dec. 26th.  Or I will bring with me if you are attending a local class, starting Jan. 4th. 

Please use drop-down menu to see your options.


SAVE the DATE Celebration Cards


Click here to see
SAVE the DATE Monthly JOURNAL Kit.
Buy Both ($90) and get FREE Shipping!


*You can do either SAVE the DATE Kits in class
Class Schedule 

Thurs., 
Jan. 4th        American Fork Senior Center       6 - 8 pm
Friday, 
Jan. 5th         Layton Hobby Lobby                  10am - noonFriday, Jan. 5th         Layton Hobby Lobby                  2 - 4pmFriday, Jan. 5th         Layton Hobby Lobby                  5:30 - 7:30 pm
Mon., Jan. 8th           Sandy Hobby Lobby                  2 - 4 pm
Tues., 
Jan. 9th          South Jordan Hobby Lobby         5:30 - 7:30 pm
Wed., 
Jan. 10th         South Jordan Hobby Lobby        10am - noon
Wed., Jan. 10th         West Valley Hires Big H              6 - 8 pm


What you'll need: 


Adhesives:  

Roller-type adhesive for putting cards together.  
Regular Foam squares

THIN foam squares
1/2" foam roll 
Mini & Micro Glue dots 


Tools & Supplies:
Scissors

Paper Piercer 
Corner Rounder

Fine Grit sanding block
Large lid or small container to place small items from kit
Distress ink: Pumice Stone & Stamping Sponge
Ranger Stickles (Glitter Glue) Diamond

If you have any questions, please let me know.

...and would love if you posted these pictures to Pinterest! 


Tuesday, January 15, 2013

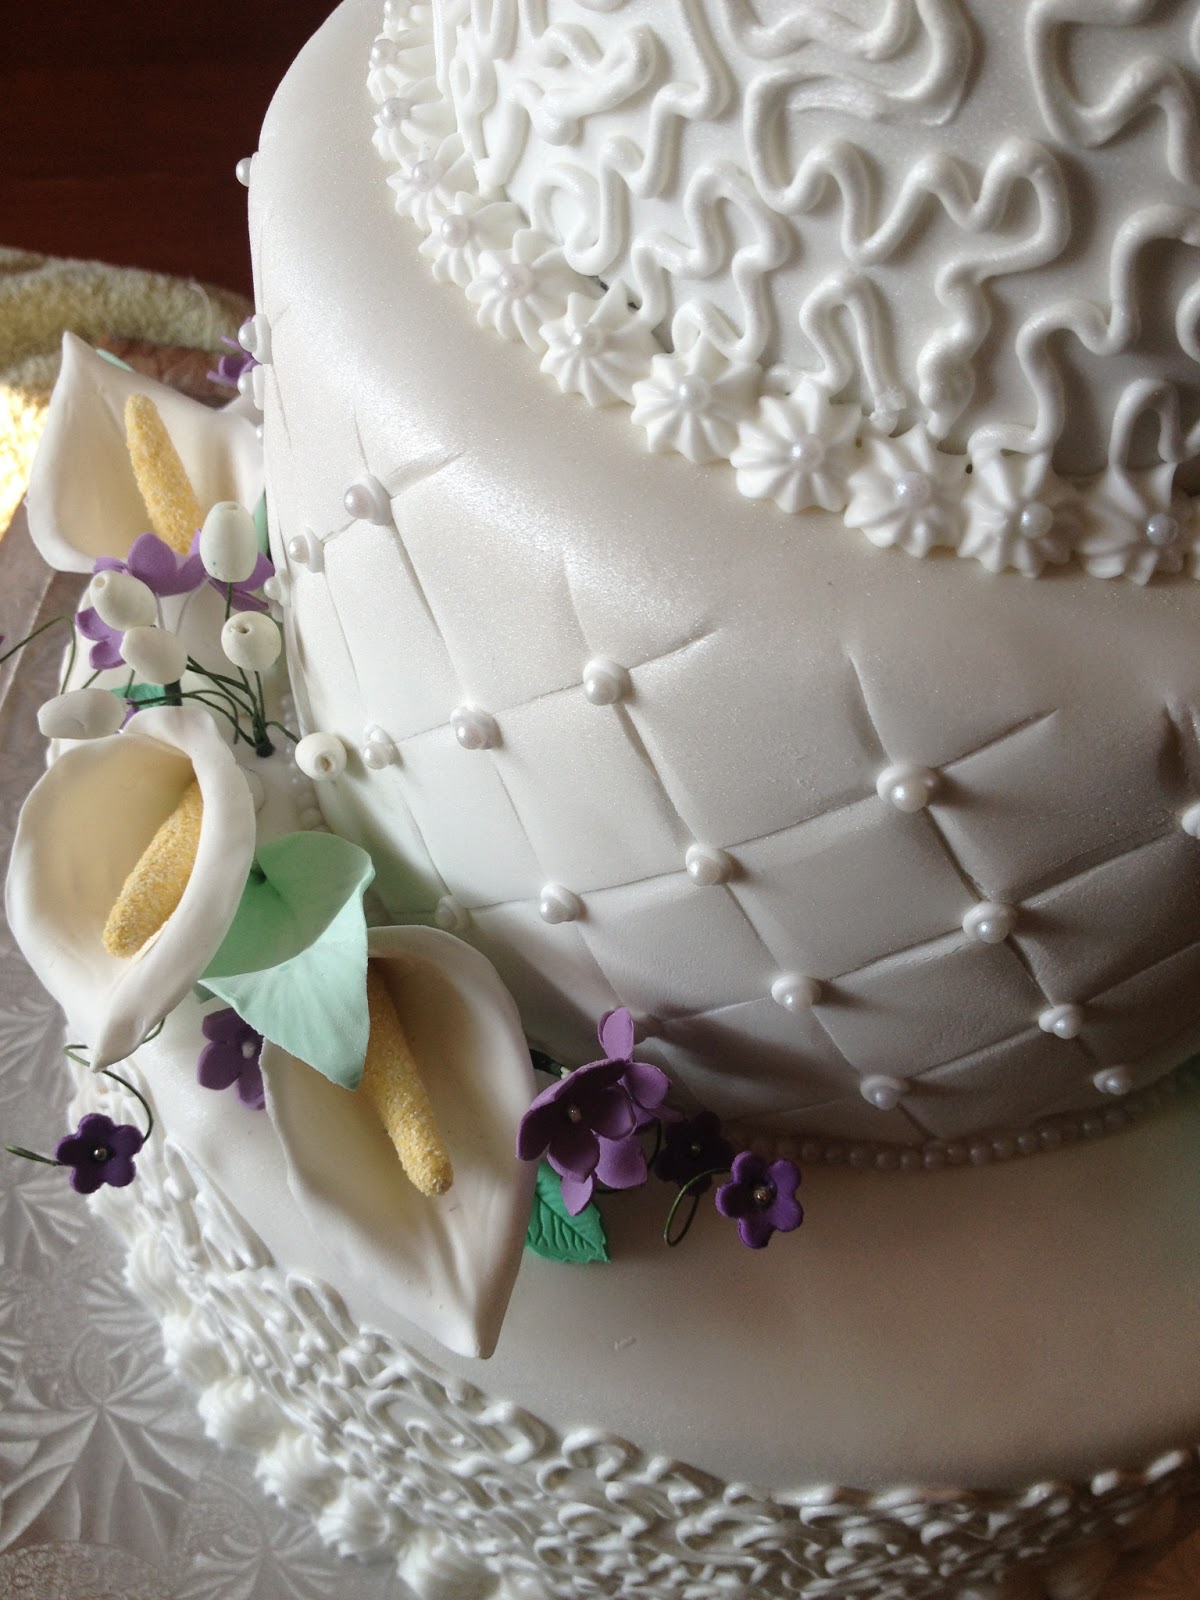
Wedding Cake Adventures Part 5

I read once that creating a wedding cake is like giving birth.  You don't love the process but are thrilled with the outcome.

This is my 5th wedding cake and I mostly agree with this statement.  I'm not always thrilled.  And I do love parts of the process, but yes, it's stressful and nerve wracking and one of my most creative endeavors to date.

Our dear friends, the Rings had their only daughter, Lizzy, get married a few days after Christmas.  My daughter, Emma and Lizzy grew up together and spent equal time in each others house, so their was no question, when asked, that I would make a wedding cake for her. 

Lizzy is in the military, in TX and didn't have a lot of time to contribute to her wedding, but I got a few important directives from her.  Colors.  Flowers.  Pearls. 

I think this is my favorite, least problematic cake to date (yes, those two things go together!). 

I am getting better.  Learning new tricks and skills each time I do this.


Most of the cake was made before Christmas (Sugar paste, cakes), but I had to fondant, layer and decorate right after Christmas, while I was just sick with the flu.  I literally got this done just hours before I got so sick I could hardly get out of bed.  Obviously and very disappointedly, I wasn't able to attend the wedding or reception.  I just sent my 'emergency fix-it kit' with Debi and hoped it tasted good.  They reported it did taste good.  Yay!

I took these pictures on my kitchen table, so they aren't the greatest, looking forward to seeing the professional pictures.

I thoughts I'd share a few step-by-step photos of the process.

Calla Lilies are actually one of the easiest gum paste flowers to make.  As you can see, just cut out a heart, thin out the edges (I also used a mold for some extra detail) and wrap around a cone cup and mold into a calla lily shape.


You have to make the centers the night before to give them time to dry.

I painted them with gum-paste 'glue' and rolled them in corn meal.  I prefer this to yellow sugar crystals, I think it looks more natural.

I made tons of small purple flowers in two sizes and two shades.

I also made some white berries (which I thought lent itself nicely to a winter wedding).  I really loved how the berries added to the arrangement.


After 2 1/2 days all my decorations were done and ready to go.  You would think that the hard part is over, but actually arranging all these pretty things on the cake is what stresses me out.  In fact, I made a Calla Lily cake for my friend, Audrey, and really struggled with the arrangement.  I actually much prefer this more natural looking style, but as I said, I'm still learning.


I really enjoy doing the Cornelli lace technique.  I used a slightly larger tip compared to the one I used on my niece, Leia's cake, which you can see here.  

As you can also see, I really enjoy doing the diamond shape effect on one of the layers.  I just think it looks very wedding-ish. 

Here is a link to my very first wedding cake.  It was for my daughters wedding a few years ago.  I seriously can't believe I managed to get a decent looking cake out!  I haven't used my Cricut Cake since and I'm not sure why exactly, because it is pretty cool.  Wait, actually, I did use the Cricut cake for the monograms on Leia's cake. 

I still need to do a post on Cake #4 that I did for my son Jordan and his wife Kelli.  Sadly, it's my worst cake and I'm a little embarrassed...but I will get to it!

Now, I just wonder...what will be my next wedding cake?  Who's getting married next?  Hmmmm....  Honestly, no hurry, I can wait a bit, I'm tired.


Sunday, October 16, 2011

Wedding Cake #3: Audrey & Mike

This is my third wedding cake...this time for a very sweet woman, friend and student of mine, Audrey.
It was an honor to be just a wee part of this special day.

Best part of this cake was the inside...Audrey had requested a banana cake and I played around with a recipe until it was a winner.  This recipe works well for a wedding cake, but is also great in smaller versions or even cupcake/muffins.  I added coconut to my cupcake/muffins and loved it!

Buttermilk Banana Cake

2 1/2 cups all purpose flour
1 Tbsp Baking Powder
1/2 tsp. fine sea salt
3/4 cup (1 1/2 sticks) butter, room temp.
2 1/2 cups sugar
6 large eggs
1 cup plus 2 Tbsp. buttermilk
4-5 small very ripe bananas (aobut 1 1/2 cups)

Preheat oven to 350 F. Butter & flour two 9" diameter pans with 1 1/2" sides.
Sift flour and baking powder into bowl.  Add salt and mix.
Beat butter, then slowly add sugar until light and fluffly.
Add one egg at a time, beating between each one.
Add dry ingredients to butter mixture in 4 additions alternately with buttermilk in 3 additions.  Do not over-mix.

Bake cakes until tester inserted into center comes out clean, approx. 35 minutes.  Transfer to rack; cool 15 minutes.  Invert cakes onto racks; cool completely.  These freeze very well.  After completely cooled, wrap in plastic wrap very well.

Option:  I poked the cake all over with a toothpick and poured a butterscotch syrup over the cake.  This made for a very rich and moist cake.  If you do this step be sure to place a round of waxed paper or parchment paper over the top before you wrap with plastic wrap.

Butterscotch Syrup
1 ½ c. sugar
1 ½ cubes butter
2 Tbsp white corn syrup
¾ C. buttermilk
1 tsp. soda
2 tsp. vanilla


Combine all ingredients but vanilla in saucepan. Cook 7 minutes, stirring every so often, barely boiling. Remove from heat and add vanilla. Store in fridge. Reheat to serve.


White Chocolate Cream Cheese Frosting
{this is deadly good}

6 oz. good-quality white chocolate, chopped.
12 oz. cream cheese, room temp.
1/2 cup butter, room temp.
1/4 cup powdered sugar
2 1/2 tsp. vanilla
2 1/2 tsp. coconut extract
2 Tbsp fresh lemon juice

Melt white chocolate over double-boiler until melted.  Let cool to room temp, about 5 minutes, it will be slightly warm to the touch.
Beat cream cheese and butter in large bowl until light and fluffly.  gradually beat in the melted white chocolate.  If you put this in when it's too warm, then it will not be smooth, which happened to me on a test batch, but to be honest, it was still delicious, so DO NOT throw it away!  :)

Add the rest of the ingredients and beat until smooth and mixed in.  Will store in the fridge for a few weeks. 

Enjoy!


Wednesday, April 6, 2011

Wedding Cake Adventures: Part II

Something possessed me to offer my extremely limited cake-making abilities to my niece, Leia, when I found out she was getting married.

{See Wedding Cake Adventures Part 1 here.}

She took me up on it and graciously told me she really didn't care about the cake...perfect!  Permission to really mess it up!


I drew a sketch of a beautiful 5-tier cake.  Two bottom square layers (largest 16" square, next 12" square, then a 10", 8" and 6" round cake.  Colors to match hers; red, black and blue.

She mentioned Roses and black lace.  Really, having known my niece since she was born, it was quite easy to picture the perfect cake for her.  a Princess cake!

I made the cakes and got them in the freezer, almost 20 batches of cake!

I started on the Roses a couple of weeks ago.  Made out of sugar paste, I googled every Gum-paste rose tutorial I could find and made my first attempt.

Bah!

My first five just didn't look very good, but I started getting the hang of it and started in on what would become a very long process.


I started by coloring the fondant to a deep red.  It took a ton of red paste to achieve that color, but I will say, that after letting it sit, the color became more bright and red. 

I rolled out a small piece of gumpaste and cut out my petals.  Then each petal had to be rolled out to a very thin and slightly curved petal.  It kept drying out on me, so I got very good at keeping the paste and petals covered.


 I used 6" sticks for the pick and created the bud first (small tear drop shape at the end of pick).

With a little brush of water, I started to curl each petal around the bud.  You can see the progression in this photo.  Each Rose took about 18-20 petals.  I made almost 40 Roses, but 12 of them were not fully opened.


In the end (about 1/2 hour per Rose...is that slow?) I had a whole bouquet of sugar Roses, making the cake completely edible.  Not that anyone would enjoy eating one of these!


I made a ton of little blue flowers in two sizes.  The larger ones got a sugar pearl in the center, the smaller one got a silver non-pareil.  I wasn't quite sure how I was going to use them, but wanted a little touch of the blue in the cake.  I ended up using the smaller ones in the center of each quilt intersection, and they also hid a few dowels!


Sunday morning I started to assemble the cake. 

I started with the largest layer, the square bottom.  I got it all iced and ready for the fondant.  The next few hours were not pleasant.

Try as I might, I simply could not get the fondant on that cake without it cracking.  I'm not entirely sure what the problem was, but I think it may have had something to do with the red and black color paste I used in it, as the texture was very different than using white fondant.  It was also very hard to roll out a large enough piece to cover a 16" x 16" x 4" cake!

After four 4 tries, I gave up.

We tore off the red fondant and took a picture or it and the cake underneath.  Not so pretty.  Within seconds of this moment, the doorbell rang.  There was Leia, her husband-to-be and her cousin...big smiles!  Anxious to see how the cake was coming along.

Argggggg!  We all stood guard and unequivocally told them 'no, sorry, you can't see it'.

I think Leia thought I was joking, but a few minutes later, she knew it wasn't funny at all!  There was simply no way I was going to get her all stressed out over my disaster on the kitchen table.

I took a deep breath and made a decision.  My 5-tier cake was turning into a 4-tier cake!  Instead of taking out the next square layers out of the freezer, I cut down the one I had already been working on.  It was still very challenging to get it covered with the red fondant, but somehow (with a little prayer), we got it on.  The corners were horrible, but I had plans for camouflage!
It was such a relief to get the bottom layer done, but it was getting late.  I still had a lot to do!  The round cakes and white fondant went together quickly.  In the process, I did pick up one trick.  Place your cake turn-table on a large #10 can or something similar.  The fondant will stretch out and hang a bit, which made creating smooth sides much easier.

Next, I created the quilted look on the 3rd and 1st layer.  I bought a quilt cutter and wow, do I love that tool!  I didn't space it very well, because I was short on time, but I loved the look and was very quick.
I piped a decorative border around the edges of the white round cakes and started on the bottom red square cake.  This was going to be a challenge.  Somehow I had to make it look good.  I made the mistake of using cornstarch on it, as I was rolling it out and it did not look very good.  A little alcohol and a brush helped that situation out.

I had several ideas for creating a black-lace look on this layer, but went with what I thought would be the easiest and the quickest; piping cornelli lace.  My hand and wrist were killing me by the time I was done, but it successfully hid alot of my mistakes. 

By now it was time for bed, but I stayed up to finish the quilting.  I created more of the little blue flowers (55 in all) to use on the quilt intersections of top layer.  I loved the look!  They were so sweet!  I was done by 12:30am.  We had to get up early for the wedding the next morning, but I knew I would have a little bit of time the next afternoon (before the reception) to finish the cake topper.

After a wonderful wedding and luncheon, we made it home around 3:30pm.  I had two hours before I had to bring the cake over to the reception center.  I pulled my new Cricut Cake (in all it's bright red shinyness!) and cut Leia's and Brandon's monograms.  I really should have let my gumpaste sit for 24 hours, so it wasn't perfect, but at this point, I wasn't being picky.
I pasted the monograms to two white circle medallions I had made and then brought the cake and everything else over.  My friend Cheryl and I held the cake in the back seat of my husband's truck, holding our breath on each pot-hole, train track and curve, but all was well and safe.  Phew!

Leia & Brandon cut the cake and smushed it all over their faces. 

We clapped. 

We smiled. 

It was a great day and I was honored to be a part of it. 

Wednesday, March 23, 2011

One Sticker - Two Cards

These are not your Mother's stickers...or my own, for that matter.  Remember the early days of scrapbooking / card making and your local store had rolls and rolls of stickers?

Yes, I have a small stash of those.  Bet you do too.

I found these 4-in-1 stickers a few years ago at a clearance store.  I bought 12 of them, thinking they would make a quick card.

Well, 2 years later and 12 hours before my card group met for lunch and exchange, I put them to use!  And yes, they really did make a quick card!

Even better, I'm going to get two months worth of cards out of these stickers.

When you have to make 12 cards every month, the trick is to keep your eye out for multi-packs.  Or in this case, a clearance price that makes it worth it.

Amazingly, I found these still available online: Memories Complete.  They are called Dollar Stickers. 

They are $1 each online, but I found a coupon code of 30% off (MC30).  They are located in Lindon, UT...maybe they would allow pickups?
 
I actually pulled out a stamp for this card!  (I really need to start stamping again.)  I needed some kind of sentiment to fit into the circle.  A few more great stash items: Prima flowers, some gem brads and the old 'little extra' standby, glitter glue!

Super quick, bright and just what I needed in my card file: Wedding cards!  It seems like everyone is getting married this month!

Saturday, March 12, 2011

Timeless Bridal Shower Theme

My philosophy: every great celebration starts with a good invitation!  It sets the tone, emphasizes the theme, adds anticipation and becomes a intergral part of the memory. So, I'm putting my "good Aunt Sue" hat on and will be hosting a bridal shower for my beautiful niece, Leia next week.


I decided a few weeks ago to use a card design I came up with a few years ago.  You can see and read the original post here. It starts with an large oval, folded lengthwise to meet in the center.  I used Bazzill's embossed polka-dot cardstock. 

Leia's colors are perfect for her dark coloring; red, turquoise and black.  Striking! 
Next priority was the photo.  This bridal shot was SO Leia.  It's all about those red shoes!  I loved how both her face and shoes peek out because of the curve of the card front.

The belly band was easy, as I knew I had to add a splash or turquoise and some black lace.

At this point, I hadn't decided on a theme, but after playing with all sorts of centers I decided an Around-the-Clock theme was perfect.  I created this a digital roman clock after all my clock stamps didn't size properly. 

Lastly, I worked on the insert and all the text I needed to incorporate. I was almost done when I came up with the 'bright idea' (read: more work!) of creating a clock that opened to reveal Leia's & Brandon's monogram on the inside and the theme of the bridal shower.


I found this circle shaped mini card on Fabulous Finds Cricut Cartridge.  I added a fun dimensional gem to the middle of the clock, but because of it's dimension I had to place a mini glue dot on the backside.  What worked with this is the slight stickness of the glue dot helped to keep the circle closed.  You may want to de-tackify the glue dot a bit, by rubbing it with your finger.  The natural oils on your finger will make it less sticky.


If this is something you'd like to use for a bridal shower in your future, you can download the clock and bridal shower circles.

Stay tuned...I'll post more photos after the event!


Monday, October 4, 2010

Perfect Light & Fluffy Cupcake Frosting

I'm so sorry it's taken so long to blog about my cupcakes and the PERFECT frosting, but here it is, finally!

So, let's start at the beginning...when we first started planning my daughter, Emmas' wedding the plan was a 5-6 tier cake that daringly, I had planned to make myself.
Having attended a few weddings this spring, where beautiful cakes weren't even eaten, I started to formulate another plan.


I had picked up this large, pretty silver tiered tray earlier in the year and quickly figured that the top was large enough to hold a small wedding cake. The other two tiers could hold matching cupcakes that could easily be eaten and enjoyed, while still leaving a pretty wedding cake for display and of course, to traditionally cut into and smear all over the groom's face.


You can see the cake here.

My biggest dilemma with the cupcakes was the frosting.  I love the look of a heavily frosted cupcake, but hate the sickly sweet and heavy taste of it.

After much googling, I found it!  And I'm sharing it with you because I have never had such a good frosting before in my life.  It pipes beautifully, looks fluffly and tastes light and divine.
It's an interesting recipe and has a slight learning curve, but stick with it because you NEED this recipe!
I was also happy to discover the recipe came from a couple of Utah gals (who live elsewhere now) and who have even been on my favorite morning lifestyle show, Studio 5!

Please visit My Best BItes for Light & Fluffly Frosting, Chocolate Light & Fluffy Frosting (it's also really good) and many other great recipes. 
They have entered a cook-off contest with Better Homes and Garden and would appreciate your vote.  You can read about it here.


Ok, so for the 'rest' of the story...  I made TOO many cupcakes!  I was nervous I wouldn't have enough and in the end had about 200 left.  What the heck was I going to do with 200 cupcakes that cannot be frozen?
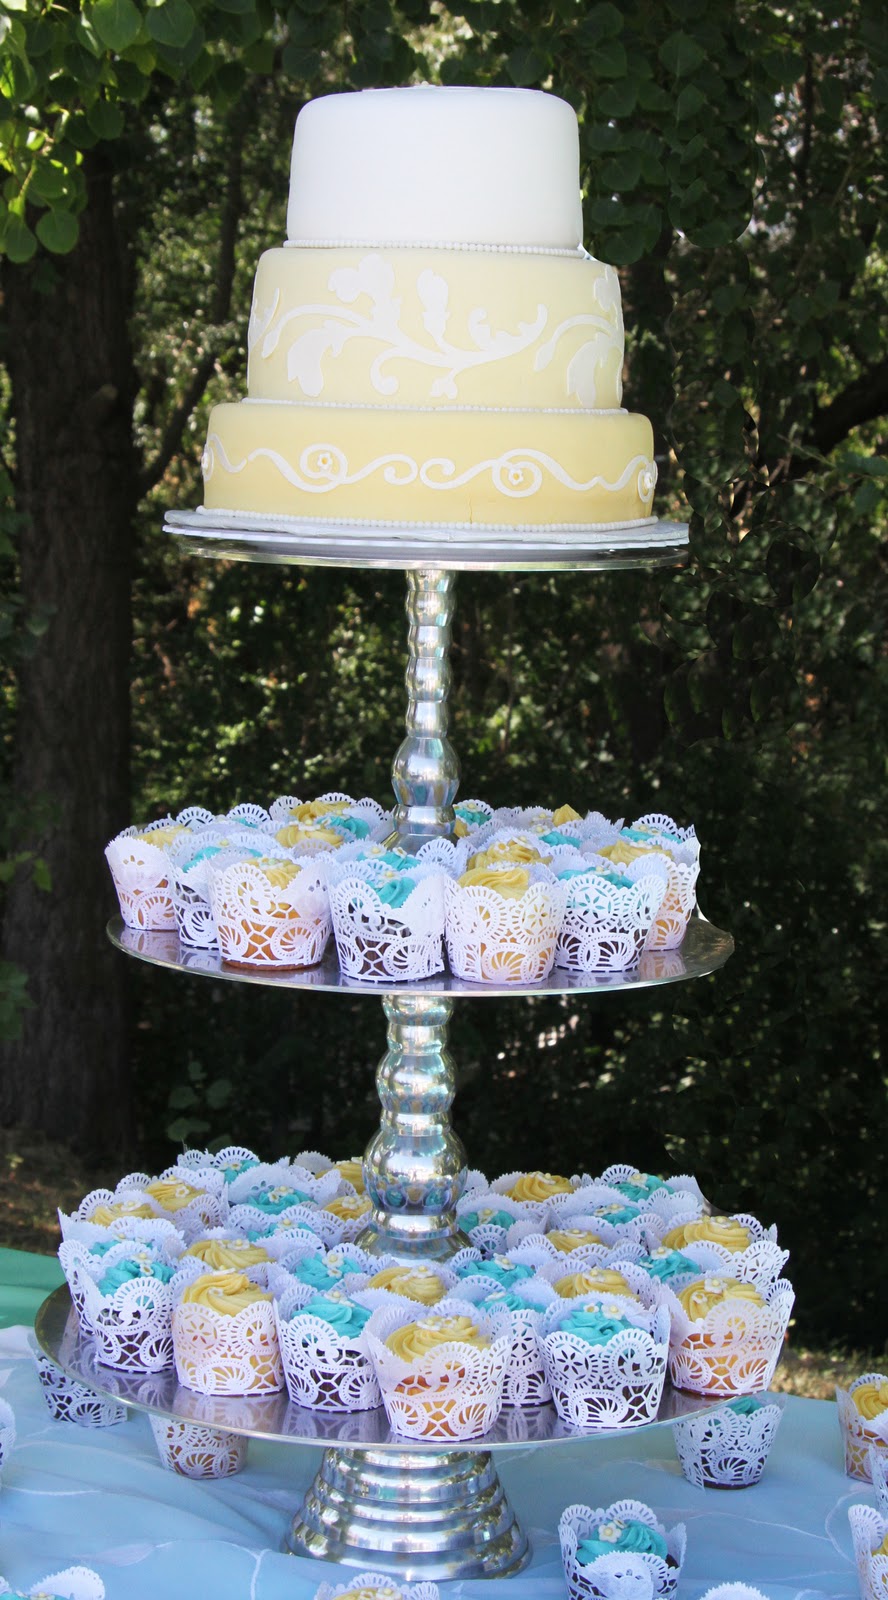
My 14-year-old daughter, Savannah, to the rescue.  Along with a friend, she door-ditched the entire neighborhood with plates of blue & yellow cupcakes.  In the end, I had 6...yes, count them, SIX left.  Which of course, we gobbled up. 

Here's a few shots of the happy day.


Q's Creative Card Classes's Fan Box

Contact Me

Favorite Quote

"The art of being
HAPPY lies in the
POWER of extracting
happiness from
COMMON things."
~Henry Ward Beecher

Subjects


Q's Creative Card Making Kits | Creative Commons Attribution- Noncommercial License | Dandy Dandilion Designed by Simply Fabulous Blogger Templates

01 09 10