Showing posts with label Classes. Show all posts

Friday, August 2, 2013

Q's Creative Cruise: back from Alaska!

Wow, that week went by way too fast, guess that's what happens when you're having so much fun.

Now I know why I never got around to doing this after our first Mexican Card Making cruise...I've been working on these photo collages for days now.  We took SO many pictures, but here are a few highlights.


We sailed on Rhapsody of the seas with Royal Caribbean out of Seattle.  All ships that take the inside passage to Alaska are smaller (so they can fit!), but I really liked the size, I only got lost once!

My favorite part of the day was meeting everyone in the dining room, catching up on our day's activities, getting to know each other better and of course, enjoying being served a lovely dinner.

We had some great entertainment on this cruise and by far, the highlight was a singer/impressionist that had us in belly stitches.

What really made the night special is when he picked on one of our sweet couples, Fran & Vince Earnhart.  They were such great sports about everything, Vince danced for us all and well, Fran...I never knew she was such a flirt :)

Service, as usual, on a cruise, was superb, and as silly as it sounds, we looked forward to our towel animals, turn-down service and just having someone cleaning up after ourselves everyday...what a treat!

 It's always a bit nerve wracking for me when I reserve the conference rooms on a cruise.  You just hope it's big enough!

Happily, it was and once we arranged the tables and chairs, we were happy campers.  We kept our classes to sea days so no one missed all the fun in port (including me & Heather).

One of my surprises for the ladies was a Ott-lite mini flip light and a tote for the table.  So, so glad I did this because the lighting in the room was terrible. 

You can also see another one of my surprises was a custom sewn apron (thanks Heather!) with my logo and the cruise date on it.  Hopefully, a nice little memento.

We had some very patient husbands on this cruise, fortunately, we had a nice lounging area right outside the classroom.
Our first stop was Juneau.  What a fun-filled day, there was SO much to do.  A group of about 12 of us did the dog-sledding excursion, what a blast and so interesting.  Of course, the highlight was playing with the puppies!  Sadie was a resident dog-whisperer, the rest of us are just regular people.

Back in town some of us went to Tracy's Crabshack (made famous last year by a visit from Top Chef's (TV) finalists.  It was new food for a few who thought it was ok...me, I was in crab heaven.

With time to spare, we took a shuttle to the Mendenhall Glacier, and hiked out to the waterfalls.  A tiring but fun, fun day ended with a whale tails and a stunning sunset as we pulled out of Juneau.


Skagway is famous for the whitepass train ride, which of course, we couldn't pass up.  Heather and I spend most of the time between cars with cameras in hand.  It was one beautiful vista after another.
Before we headed back south, we entered the Tracy Arm Fjord early, early Tuesday morning.  We set the alarm for 5, 5:30 and 6am.  At 5 we peeked out the window and didn't see much, same with 5:30, but at 6, we started to see ice in the water, so we bundled up and headed top deck to take pictures.  The sun was behind the glacier, so the photo opportunity wasn't great, but it was still exciting to be that close (1 mile) from all that ice.  

Our captain turned the ship so everyone could get a great view.  Fortunately for us, while we were facing it, the ice calved (where part of the ice cracks off and crashed into the water).  So happy we saw that.

Once we left the glacier and headed back out, Heather and I moved our couch in front of the window, put our feet up, had breakfast and enjoyed the stunning view; waterfalls, mountains, valleys, seals, gulls...then we napped :)


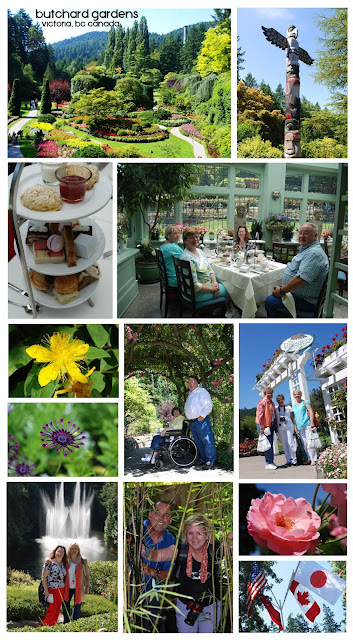
Our last stop was Victoria, BC in Canada.  This was a special day, as we chartered a bus for all of us.  We had an awesome driver/guide that plied us with all sorts of great tidbits as we drove the scenic route to Butchard Gardens.

It's hard to describe just how beautiful these gardens were, there are just not enough pictures to do it justice.  We met in the dining room for our special tea/luncheon we had arranged ahead of time.  The sun-lit room filled with orchids and silver tea services was glorious.  The tiered serving dish with cute little sandwiches, cakes and scones didn't look like a lot, but wow, we were full afterwards.  I think we all felt like Queens...and Kings :)

On the way back our driver, at our request, stopped by a Tim Hortons Donut shop, I jumped out (literally) of the bus, ran in, impolitely asked to get ahead of everyone in line (the bus driver said I had to be fast because he couldn't stop there for long) and of course, they all let me because they are polite Canadians, but I'm sure they thought I was rude.  I bought a couple of 40 piece Timbits, which are basically the 'holes' of the donuts.  So fun to share this Canadian treat with everyone on the bus...NOT that they were hungry of course, having just downed lunch.

Some of us visited downtown Victoria afterwards finding wifi hotspots, strolling and shopping (I found my Big Turks for Steve...Canadian chocolate bar).

It's hard to describe just how fun these cruises are for all of us.  We started talking about the next cruise the first night (I know, that's just silly).  It's a very bonding experience for all of us and if we didn't know each other before we came, we leave with new friendships that I'm sure will last a lifetime.

Good to be home now...focusing on preparing for the rest of my regular classes for the year.  Exciting to share those with you all, as well as the classes we did on the cruise...so stay tuned, it's all coming soon!

Sue

P.S.  Speaking of next cruise...November of 2015 is the plan in case YOU want to plan :)


Tuesday, November 10, 2009

Q's Creative Card Class ~ Tag Box

I am a paper crafter. I make pretty things out of paper. WHY, then, do I panic every year on Christmas Eve and end up using business labels, folded-over wrapping paper and other quite tacky ways of 'tagging' a gift.

{click to enlarge}

Never again! This year I've designed a Christmas Tag Collection Box that is so pretty that I'm leaving it out as Christmas decor and a ready reminder that it is filled with tags for the whole family to use!

This class will include everything you need to alter your paper mache box, create cute compartments and enough paper and embellishments to stamp 50 tags! That's 10 each of 5 different designs.


I've tried to schedule these classes for the earliest part of December because I know it's a busy month. I also figure that having a small break, creating something so useful and sharing some Christmas cheer (as in music & goodies) is a good thing.

Sandy: Tues. December 1st, 10-noon
Provo: Tues. December 1st, 6-8pm

South Jordan: Wed. December 2nd, 10-noon
Orem: Wed. December 2nd, 6-8 pm

Centerville: Fri. December 4th, 10-noon
Clinton: Fri. December 4th, 2-4pm
Clinton: Fri. December 4th, 6-8pm

West Jordan: Wed. December 9th, 6-8pm
American Fork: Thurs. December 10th, 6-8pm

You will need to purchase the following for this class:

Most of the Roberts have these in stock. They are kept in the back where the classrooms are, so you might want to call first to make sure. Or, just purchase them in class. The Stamps are $12.99 and the boxes are $6.99...but use your coupons (50% this week) and save! Notice there are 3 boxes in the set? We'll be altering just the largest one, but I will be sharing several ideas on how to alter the other two.

Also, bring the following basics to complete the project:
  • Trimmer and scissors (fine tipped and long)
  • Adheseive (variety: Roller tape, pop-up squares, mini glue dots, dotto etc...)
  • Bone Folder, exacto knife & self healing mat
  • Pencil and ruler
  • 1/8" hole punch and micro hole punch
  • EK success Small Daisy Punch (we'll have some in class)
  • Brown Ink pad (preferable Versafine *instant dry* Vintage Sepia)

Hope to see you all there!

Saturday, October 3, 2009

Nifty Thrifty Christmas Cards Class

Sorry this kit is sold out.
________________________
I thought today would be a perfect time to release my newest class, Nifty Thrifty Christmas Cards...


Many of you already know that the genesis of many of my classes are my personal needs. (So selfish!)

Every year I struggle with the long list of to-dos for Christmas and the one thing that rarely gets done is Christmas cards. I almost made it last year, but due to a printing issue (they were photo cards), I ended up sending a digital card instead (is that
tacky?).

This year, my challenge to me and YOU is to make all my own Christmas cards and send them out the weekend after Thanksgiving. What do you think? Are you up for this challenge? Will you join me?

To make it easy for you and me, I've centered my class around a set of digital images I created for WCMD a few years ago, cal
led Heaven & Nature. I specifically designed these cards to be thrifty, quick and cute (of course!).

I'll be offering you all sorts of time-saving and mass-producing tips in class and for added value, the class will include all the digital images so you can make more at home.

I'm also offering (because several of you have asked!) individual cards (you pick!) in kit form in multiples of six. This could really make getting your Christmas cards done early a real possibility. Everything will be printe
d and pre-cut, you'll get these put together is record time!

Class Schedule is:
Wed. Nov. 4th 10-noon South Jordan
Wed. Nov. 4th 6-8pm Orem
Thurs. Nov. 5th 6-8pm American Fork
Fri. Nov. 6th 10-noon Centerville
Fri. Nov. 6th 2-4pm Clinton
Fri. Nov. 6th 6-8pm Clinton

Tues. Nov. 10th 10-noon Sandy
Tues. Nov. 10th 6-8pm Provo
Wed. Nov. 11th 6-8pm West Jordan

Supplies to bring to class:
Trimmer and scissors (fine tipped & long)
Adhesive (Variety: Roll tape, pop-up squares, mini glue dots, dotto, etc...)
Bone Folder, Exacto Knife & self-healing mat
Pencil, ruler & Push pin
1/4" hole punch, micro hole punch and corner rounder
Crystal Glitter glue (Ice stickles) and loose crystal glitter
Glossy Accents or Diamond Glaze
1" and 1 1/2" circle punches (will have some in class)


I'm just dying to know if I'm the only one who struggles with Christmas cards...so leave me a comment and I'll pick a few winners. The prize? My Envelopement class kit ($19 value!).

And that concludes my WCMD activities...it's been a fun day for me and I hope you got to celebrate, even it just meant visiting my blog. Lots of opportunities to win as well, so make sure to read the last four posts!

And now that you've paper crafted your little heart out, it's time for some nourishment. Come back tomorrow for another little treat...one that you can eat!

Nighty Night

Tuesday, September 15, 2009

Give Thanks Class


There is no question that fall is my favorite time of the year. I love the crisp coolness, the smells, the colors and the holidays.

I particularily fell in love with a sheet of cut-outs by Bo Bunny called "Beautiful Life" and decided it would be a great focal point to my October class.

I used every single piece from the page and you'll be creating 2 cards and one 6-page Gratitude album.

You could certainly just make one album, but my plan is to make one album for each member of my family. It will double as part of the tablescape and will be a wonderful memory keepsake as well. Lots of room to journal grateful thoughts and plenty of places (including opposing pages) for pictures to be inserted later.

I do recommend though, you start with a photo for the cover, so please bring one to class. It could be a family or individual picture...you could also use a landscape picture or anything else you are particularly grateful for. The photo needs to measure 4" x 4".

We'll be doing some new distressing techniques, so please bring your favorite distressing ink, as well as a sanding block and if you have a distressing knife or blade, please bring that too.

I'll be doing a little reminder in a few weeks, so stay tuned.

My class schedule is as follows. Please visit your local Roberts (or give them a call) and sign-up!

Wed. Sept. 30th South Jordan 10-noon
Wed. Sept. 30th Provo 6-8pm
Thurs. Oct. 1st American Fork 6-8pm
Fri. Oct. 2nd Centerville 10-noon
Fri. Oct. 2nd Clinton 2-4pm
Fri. Oct. 2nd Clinton 6-8pm

Tues. Oct. 6th Sandy 10-noon
Tues. Oct. 6th Orem 6-8pm
Wed. Oct. 7th West Jordan 6-8pm

Please bring:

Trimmer & scissors (fine tipped and long)
Adhesive (Variety: roller tape, pop-ups squares, mini glue dots, dotto etc...)
Bone folder, exacto knife & self healing mat
Pencil, ruler and push pin
1/8" and micro (1 1/16") hole punch
Corner rounder
Favorite distressing ink (I like Ranger's distress ink)
Sanding block and distressing blade if you have one.

See you soon! Sue

Saturday, June 6, 2009

The Color of Bliss


bliss: /’blis/
Noun
A state of
extreme
happiness.

Two of the happiest moments in my life have been the day I married my husband and each time I had a new baby in my arms. It truly was bliss.

This class it all about those moments and also a color. This beautiful, feminine, dreamy, aqua color is just blissful to me.


We'll be creating 5 projects, 1 adorable baby bunny buggy baggie (I just LOVE alliteration!), a wedding gift/check/cash card with pocket (which also can be made into a regular card by removing the 'both' tag, a glittery 'wedding bliss' card and two thank you cards using the cool combo dies by Cuttlebug.

My class schedule is as follows:

Wed. July 8th 10-noon South Jordan
Thurs. July 9th 6-8pm American Fork
Tues. July 14th 10-noon Sandy
Tues. July 14th 6-8pm Provo
Wed. July 15th 6-8pm West Jordan
Thurs. July 16th 6-8pm Orem
Fri. July 17th 2-4pm Centerville
Fri. July 17th 6-8pm Clinton

Please bring the following to class

Trimmer and scissors (fine tipped & Long)
Adhesive (Variety: Roller tape, pop-up foam squares, Dotto tape and Glue dots)
Bone Folder and 1/8" hole punch
2" circle punch and corner rounder
Exacto Knife & Self-healing mat
Cuttlebug Combo die (#37-1719 Heart Frame) and Cuttlebug if you have one.
Black ink pad (Versafine Black Onyx recommended)
Aqua Ink pad (Versamagic Aquatic Splash or Colorbox Glacier Ice recommended)
Ice Stickles (Crystal) by Ranger
Stamp set, Hero Arts Frames & Sentiments. See your studio coordinator to purchase this if you can't find it in the store.

As always, if you have any questions, please email. Hope to see you in July!

Saturday, January 17, 2009

One card 3 ways

Here's a super-easy slide card I designed for my Roberts class using a basic Oval shape. Don't you just love a card that uses so few pieces?


You'll need a

  • circle stamp (ranging from 1 5/8" to 2")
  • an 8" Oval shape (I cut mine with Cricut Expressions. You could, however, do the same thing with a manual oval cutter or just trace & trim.)
  • 9" x 1 1/4" strip of patterned paper (stripes work well and contrast nicely with all the curved lines.
  • 4 5/8" x 4" piece of neutral colored cardstock for the insert.
  • 2" circle punch
  • 2" circle in shadow mode with cricut Basic shapes cartridge.
  • 2 1/2" scalloped circle punch (or any other shape, like the sun shape I cut with my cricut Accent essentials cartridge)

Just fold each short end of the oval to meet in the center. Just eyeball it, it's easier. Wrap and adhere the strip around the card.

Stamp image and punch it out with 2" circle. Mat with 2" shadow shape. Adhere to scalloped circle with 3-D squares and adhere to center of card. Slide insert in place.

I enjoyed making this card so much, I decided to switch out colors to create different themed cards for my stash. I never have enough man-cards!


And don't forget to turn it around for another fun look!

Sunday, October 5, 2008

World Card Making Day Celebration!


(Click on photo to enlarge)

I had an incredibly wonderful time celebrating World Card Making Day with some rabid papercrafters from Virginia (and a few from North Carolina as well) at All About Scrapbooks.

Virginia is a beautiful state with truly friendly people. I only wish I could have stayed longer.

Bob & his wife were gracious hosts who made Steven and I feel very much at home and valued.

The 25 gals who participated in the class were dedicated paper crafters who made the whole day fun, fun, fun! I can't remember everyone's names, but June & Sophie were just one of several mother-daughter attendees, Paula was my convenient side-kick (literally...I kept bugging her for samples) and I believe their resident card artist (yes, I'm still waiting Paula...please send me url!!).

Angie touched me when she told me how her military husband has kept every card she's ever made for him and Valerie was just a bundle of energy and enthusiam. Sue, who just moved from Alabama was excited to make new card-making friends, and Peggy, well you just made my day. After struggling all year with health issues, was well enough to attend the class with her daughter. You are a lovely person and are truly inspirational. I will always treasure the memory of this day and hope to see you all again one day.


So, going backwards a little, day 1 of my sojourn to Virginia started in Virginia Beach. A little day diversion for my husband and I. We had perfect weather, the people were so friendly, the sky was brilliant and the food was yummy. But, the best part was just hanging out with my dear husband, Steve.


Thanks honey for spending 2 days in a cramped plane, putting up with my constant photography, shopping 'girl stuff' and hanging out with and actually enjoying all of us crazy card-makers! You are the BEST!

So, here's to next year ladies...seriously, I cannot wait. I know it's going to be even better. Sue

Q's Creative Card Classes's Fan Box

Contact Me

Favorite Quote

"The art of being
HAPPY lies in the
POWER of extracting
happiness from
COMMON things."
~Henry Ward Beecher

Subjects


Q's Creative Card Making Kits | Creative Commons Attribution- Noncommercial License | Dandy Dandilion Designed by Simply Fabulous Blogger Templates

01 09 10