Showing posts with label Card Templates. Show all posts

Wednesday, December 7, 2011

Studio 5: Re-purposing Calendars

Oh, it was great to be back on Studio 5 again!  It's been too long!  Had lots of fun preparing these segments and hope you enjoy them.  Please watch the video, but read the article too, as I hardly touched on all my ideas.  As always too little time!  (you can see and read the 2nd part of my visit to Studio 5: Puff Pastry here)


Most of us have a wall calendar on our wall and go to great lengths (at least I do) to pick the perfect one. The one that matches my tastes and my home decor. It always hurts me to throw it away come January 1st, so I usually hang on to them for a few years. Not anymore! I am hooked! Not only will I repurpose the calendars I've used, but now I'm on the hunt for old calendars on clearance.

Probably the easiest way to re-purpose those beautiful prints and photographs is to simply frame them.

Crop them, mat them, even embellish them for a completely new look.

And because they are 'free', you can switch them out whenever you tire of them.  But don't throw them away...use them in one of many other ideas I have for a secondary re-purposing!

As a card maker, I was thrilled at how many cards I could get out of one calendar!  Here's an example of one sheet from last year's calendar I made into 3 legal sized cards.  You can keep it super simple or do a little embellishing to dress it up.

I think this could be a fun get-together with your card making friends come January.  Bring your calendars and see how many cards you can create.

To make this task a little easier I created card making templates.  You can download those templates here.   Go to the PDF file Tab on top to access the downloads.  Simply print and cut out the window.  Now you're ready to use these windows to find the perfect place to cut out your calendar pages.

Little desk calendar are great to re-purposing too. 

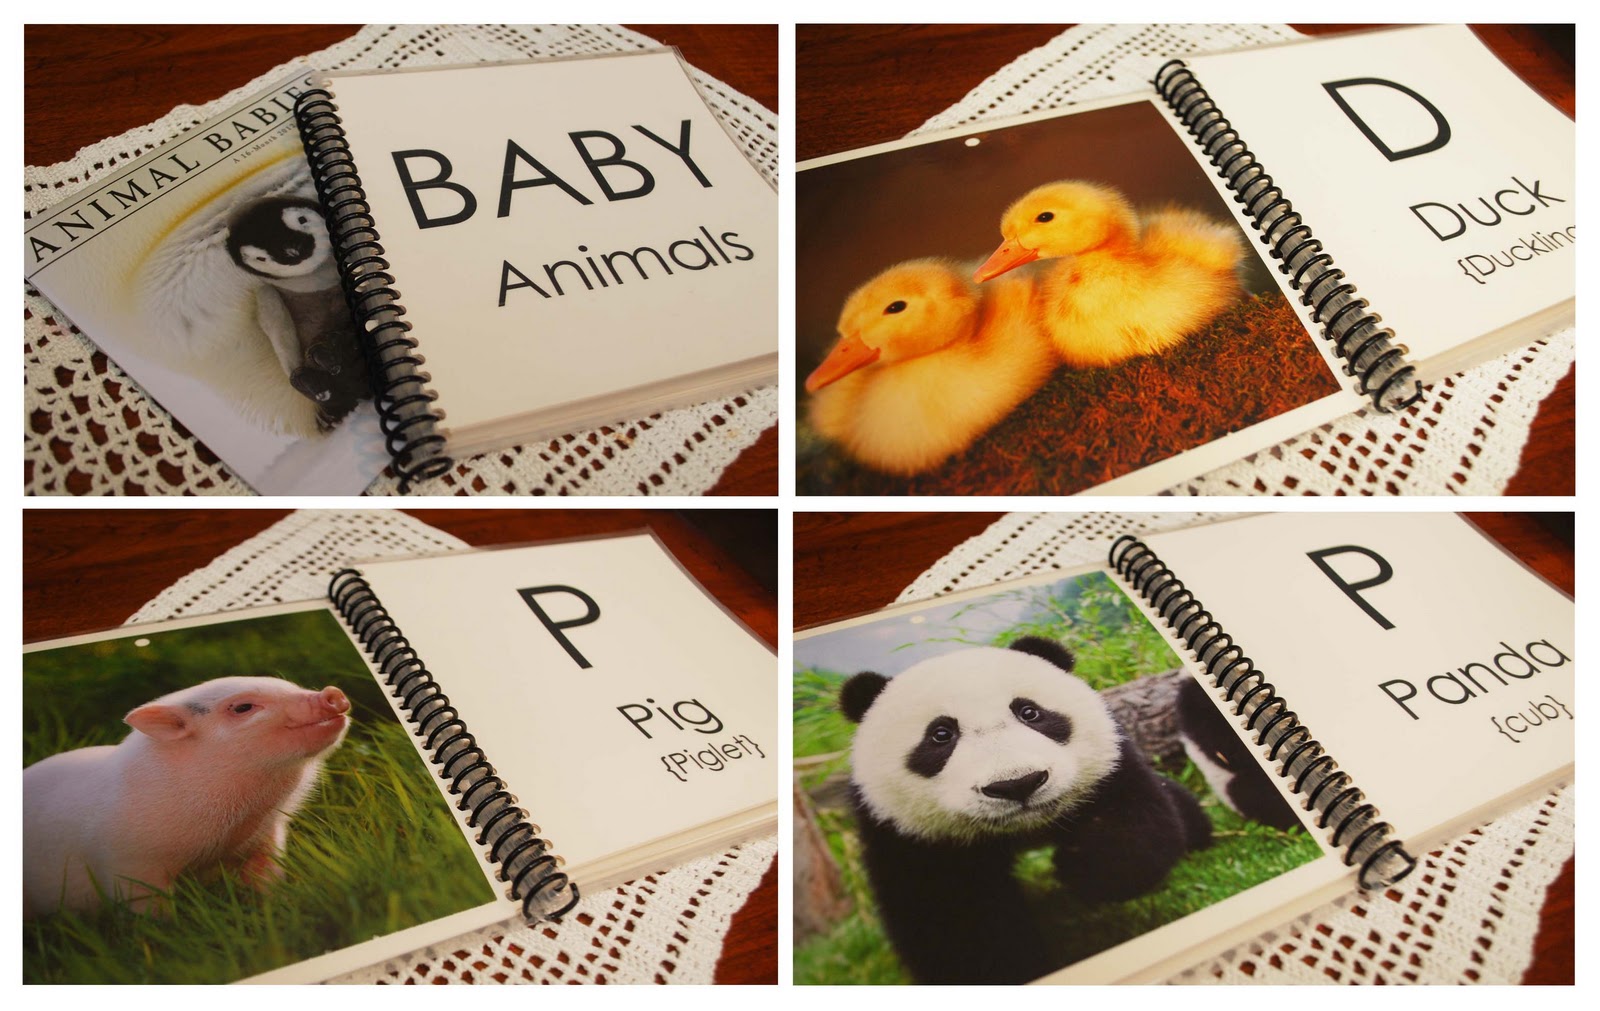
I used this little baby animals desk calendar to create a child's busy book. 

I laminated the pages and had it bound.  Cost me about $3 and it's adorable!  Even my 15 year old daughter enjoyed it.


I used another desk calendar with inspirational thoughts for women to create this friendship mini album.


Most wall calendars use seasonal illustrations and photos to match the month and every December has Christmas images.  They can transform ordinary gift bags (even ones you get when you shop) into one of kind originals.

This was so fun, I wished I had more calendars to make more gift bags!


I also really enjoyed using my calendars in home decor.  My favorite was doing a hard lamination to create place mats.  It's trendy and fun to mix & match your table decor and this lends itself perfectly to that.  They will be different, but usually the illustrations are by the same artist so there is a continuity that ties it all together.

I also used them to cover the base of serving platters and plates (as long as they are flat).  Best part is they are removeable.  ( I used ATG scotch tape for all of my projects.)

I also played around with soft lamintation and was happy to discover how easy it was to wrap it around my glass vases.  They were really stunning. 

Again, completely removable if I needed the vase with just the glass or if I wanted to change up the look.


I have several religion-themed calendars that I just couldn't throw away over the years...so glad I didn't.

I'm teaching 11-year-olds at my church and these turned into great visual aids.

Keep the study envelope that these calendars usually come in to store the pictures.

Calendars really are the gift the keeps giving!  Enjoy, Sue

Friday, February 18, 2011

Look squarely familiar?

Am I getting lazy, or just enjoying putting together a quick card?

Maybe a combination of both?  Or maybe just need a fussy-break once in a while, Or maybe this paper was just too cute to pass up and it happens to be easy to papercraft with?

Enough of these rhetorical questions!

I had card group (follow link to watch a studio 5 segment I did on my card group card group ideas and how-tos.) this week and lately, it's been a challenge to make those 12 cards regardless of how much... 1. I enjoy making cards and 2. I love meeting with my card-making friends for lunch.

 After finishing up my February class, 'Cute & Colorful Squared' I picked up four of the other 3x3 squared sheets by Pebbles with plans to use it for my card group.

I started by separating the squares (love the perforation!).  Played around with the colors and decided to go with the green/brown combination.  I'll save the red/turquoise for another month!

I then choose the project from 'Cute & Colorful Squared' that would work best and went with the clipboard card.


I really liked how the yellow looked with the green/brown.  I was in a bit of a rush, so I found these yellow flowers from my stash and  these adorable green brads by Making Memories.  Other than that, I stayed true to the original template.  Super Quick and fresh and springy.

I used the Clipboard shape from Fabulous Finds, but had to adjust the shape a bit on Design Studio so it would be square.  I suppose you could just cut it out and then trim it to make it square as well.

'Cute & Colorful Squared' class had 8 projects using 16 squares and most of them are interchangeable!  Just think of the possibilities...and then make them and then email me your creations, I always love to see what you've come up with.

I'll be ready to ship more 'Cute & Colorful Squared' kits on Feb. 28th, so place your order now if you haven't already.

Thursday, September 30, 2010

Celebrate with Banners Video with Kristine McKay

Oh my goodness, Susan Neal and Kristine McKay (super crafty Studio 5 contributor) in the same room! We had SO much fun doing this. Too much fun! We had to do several takes because we just went on and on and on. Hope you enjoy the tips, ideas and free downloads!


I knew when I found this quote by Jane Austin, that it would make the perfect birthday card.  There's nothing more celebratory than banners, so it was a great fit.  Download the PDF (or use the JPEGS) to print out 2 cards per 8 1/2" x 11" sheet of white cardstock.  The rest is scoring, folding and getting creative with punched out circles.  Mix & Match, change up the colors and make a bunch!


Here's another quick card that requires a scallop edged circle paper.  Cut off the scallops and follow the step-by-steps below.


Cut & Print technique: This is by far my favorite and most requested technique.  You'll be able to customize every card (or scrapbook page!) and will save you money. 

Create your sentiment on a word program or photo editing software.  There are thousands of free fonts to download; I like having a huge selection to suit my mood and project.

Print sentiment on plain printer paper.  Place the sentiment in the center of the page, but not right at the top.

Use re-positional adhesive to tack die-cut (or punch, or sticker or whatever else you want to print on) directly over the printed sentiment.  To check that your placement is correct, hold the page up to a light source.  Move if necessary.

Run the page back through the printer.  Perfect placement everytime!  You can download the PDF (or JPEG) on my free download page.  Enjoy!


Here's another trick...distress the edges of your die-cut before you remove it to place on your project.  So much easier!


Tuesday, January 26, 2010

Pockets!

Today's Studio 5 segment was all about Pockets (you guessed that!). One of our favorite family meals is Falafel (in a pita pocket)...watch the segment below or visit the Studio 5 website for the recipes.


We've been using pockets in paper crafting for years, but using envelopes for quick & easy pockets is a clever twist that will get your creative juices flowing. Watch the segment below and visit the Studio 5 website for more information.


Please note the Birthday Calendar Album Project is available in pre-cut kit and can be purchased here.

Three of the other projects from the segment are available from my Envelopement class/kit. You can purchase it here.

Those pretty pink envelopes were purchased from Xpedex in Utah. There were 25 envelopes in a pack and I'm going to make all of them! They were super quick & cute!

Thanks for all your sneak-peek guesses...I knew the pocket theme would be easy, but was hoping someone would guess Falafel.

Two of you (Cami B. and Rob'n'mon {Hi Monica!}) guessed a gyro, which isn't too far off the mark and then KWgirl and Heather Vincent guessed 'Cards made from envelopes', so they are my winners this month. Please email me with your mailing address so I can send off your goodies.

Thanks again ladies! I'll be back on the show Monday, Feb. 8th, have a bitty blurb this coming Friday and again on Feb. 16th. So look forward to another sneak peek in a short bit.

Monday, July 13, 2009

Studio 5 Card swapping Group & Simple cards to duplicate


Oh, well. That was just TOO much fun! I'm so glad I got to share something I love so much with everyone. If you didn't have a chance to watch, play the video below.


Also, I just found out Channel 5 is replaying the segment on the 4 o'clock news!


And our sneak peek winner is...Heather Godfrey! I know this was a toughy. I just didn't know how to make it easier. Heather, I'll email you with details about your prize.


I have a great article I put together for this segment at the Studio 5 website. Please visit to read all my tips, tricks and templates. You can also download the card templates here and save them on your computer. I'll be creating more of them in the coming weeks. I will also have card examples of each template as well.


Q's Creative Card Classes's Fan Box

Contact Me

Favorite Quote

"The art of being
HAPPY lies in the
POWER of extracting
happiness from
COMMON things."
~Henry Ward Beecher

Subjects


Q's Creative Card Making Kits | Creative Commons Attribution- Noncommercial License | Dandy Dandilion Designed by Simply Fabulous Blogger Templates

01 09 10